Aluminum Tile Edge Trim: A Complete Guide to Profiles, Installation & Benefits
Aluminum tile edge trim protects tile edges and creates a clean, finished look. It covers exposed tile sides, prevents chips, and adds a modern accent to any installation.
A bathroom renovation with aluminum edge trim keeps tiles looking sharp for years. The trim prevents cracked corners and helps the space stay easy to clean.
In this guide, you will find step-by-step instructions, profile comparisons, and expert tips to help you choose and install aluminum tile edge trim with confidence.
What is Aluminum Tile Edge Trim?
Aluminum tile edge trim is a finishing strip that covers and protects the exposed sides of tiles. It prevents chips, cracks, and moisture damage at tile edges.
Installers use aluminum trim in kitchens, bathrooms, and commercial spaces. It creates a clean border and gives tiled surfaces a modern look.
Aluminum trim comes in several shapes and finishes. You can match the trim to your tile thickness and style.
Key Features
- Shields tile edges from impact and wear
- Blocks water from reaching the tile adhesive
- Offers a range of profiles for different tile layouts
For example, a bathroom with aluminum tile edge trim resists cracked corners and water stains. The trim keeps tiles secure and easy to clean.
Aluminum tile edge trim is strong, lightweight, and rust-resistant. It works well in high-traffic and wet areas.
If you want a durable edge that protects tiles and looks sharp, aluminum trim is a reliable choice.
Benefits of Aluminum Tile Edge Trim
Long-Lasting Protection
Aluminum resists rust and corrosion. It works well in wet areas like bathrooms and kitchens. The trim keeps tile edges strong and prevents damage over time.
Modern Appearance
Aluminum trim has a clean, metallic finish. It matches ceramic, glass, and porcelain tiles. The trim creates a sharp border that makes any space look updated.
Edge Defense and Safety
Aluminum trim shields tile edges from chips and cracks. It covers sharp corners and lowers the risk of cuts. This is important in homes, schools, and public buildings.
Flexible Applications
You can use aluminum trim on floors, walls, countertops, and stairs. It fits different tile thicknesses and layouts. This makes it a practical choice for many projects.
Eco-Friendly Material
Aluminum is recyclable. Using it reduces waste compared to plastic trims. Builders and homeowners choose aluminum for its lower environmental impact.
Example:
A hotel lobby with aluminum edge trim on floor tiles shows fewer chips and cracks after years of heavy use. The trim keeps the entrance looking clean and professional.
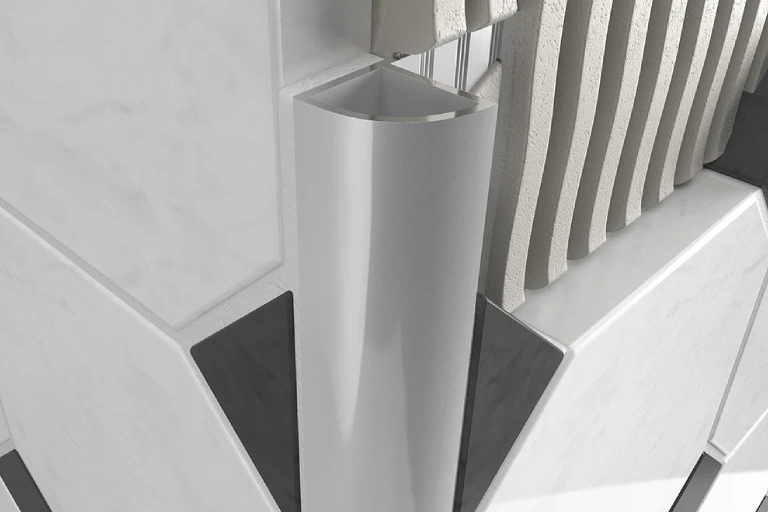
Types of Aluminum Tile Edge Trim
| Profile Type | Description & Best Use |
|---|---|
| L-Shape Trim | Ideal for external corners and step edges, subtle finish. |
| Square Edge Trim | Clean, minimalist lines for modern interiors. |
| Round Edge Trim | Softens transitions, reduces injury risk, and decorative edges. |
| T-Profile Trim | Bridges gaps between tiles, seamless transitions. |
| U-Channel Trim | Decorates and protects unfinished edges, furniture, walls. |
| Hat Channel Trim | Decorative partition between surfaces, wallboard, tiles. |
| J Cap Edge Trim | Architectural decoration, edge finishing. |
| Z Channel Trim | Used for display areas, wall panels. |
| H-Shape Trim | For furniture, doors, construction, and decoration. |
| Corner Round Trim | Softens transitions, reduces injury risk, and provides decorative edges. |
Aluminum Tile Edge Trim vs. Other Materials
| Feature | Aluminum Tile Trim | Plastic Tile Trim |
|---|---|---|
| Durability | Highly durable, corrosion-resistant | Less durable, can crack/break |
| Appearance | Sleek, modern, premium finish | Often looks less refined |
| Heat Resistance | Withstands high temperatures | Prone to warping |
| Eco-Friendliness | Recyclable | Some types are non-biodegradable |
| Cost | Moderate | More affordable |
Aluminum outperforms plastic in durability, appearance, and longevity, making it the preferred choice for professional installations.
Applications and Use Cases
Flooring Transitions
Aluminum trim connects tile to wood, laminate, or carpet. It creates a level surface and reduces tripping hazards. For example, a hallway with aluminum trim between tile and carpet stays safe and neat.
Wall Corners
Aluminum trim protects external and internal tile corners from chips. The metallic edge adds a modern accent. In a restroom, aluminum trim on corners resists damage from carts and cleaning tools.
Tile Edge Finishing
Aluminum trim covers exposed tile edges and creates a clean border. It blocks water from reaching the tile adhesive. A kitchen backsplash with aluminum trim looks neat and wipes clean easily.
Cabinet and Countertop Edging
Aluminum trim frames counters and cabinets in kitchens and bathrooms. It shields edges from daily bumps and scratches. A bathroom vanity with aluminum edging stays free of chips.
Stair Nosing
Aluminum trim reinforces stair tile edges and improves grip on steps. It increases safety and handles heavy foot traffic. A hotel staircase with aluminum stair nosing reduces slips and keeps the steps in good condition.
Furniture and Shelving
Aluminum trim finishes shelves and cabinets with a modern look. It protects edges from dents. A bookshelf with aluminum trim stays free of nicks, even in a child’s room.
Skirting and Baseboards
Aluminum trim guards wall bases from cleaning equipment and foot traffic. It creates a sharp line where the wall meets the floor. In an office lobby, aluminum baseboard trim keeps walls clean and presentable.
Aluminum tile edge trim delivers reliable protection and a clean appearance for floors, walls, stairs, and furniture. Its strength and versatility make it a preferred choice for builders and homeowners.
How to Choose the Right Aluminum Tile Trim?
Material Quality
Select high-grade aluminum. This material resists corrosion and holds up in wet areas. Low-quality alloys may bend or discolor after installation.
Tile Thickness
Measure your tile thickness. Match the trim height to the tile for a flush fit. For example, use 10mm trim with 10mm tiles to avoid uneven edges.
Profile Type
Choose a profile that fits your project. L-shape trims work for outside corners and wall edges. Square or round profiles suit countertops and backsplashes. T-profiles connect different flooring types.
Finish and Color
Pick a finish that matches your space. Brushed and matte finishes hide fingerprints. Polished trims add shine. Select a color that complements your tile and décor.
Project Requirements
Consider where you will install the trim. Wet areas need corrosion-resistant options. High-traffic spaces require thicker, durable profiles. Match the trim style to your room’s design.
Example:
A hotel lobby with heavy foot traffic needs sturdy, anodized aluminum trim. This option handles constant use and frequent cleaning.
Checklist:
- Confirm tile thickness and trim size.
- Select a profile for your installation area.
- Choose a finish and color that fit your design.
- Assess moisture and traffic levels in the space.
The right aluminum tile edge trim protects your tiles and keeps your installation looking sharp. If you need help, ask your tile supplier or contractor for advice.
Installation Guide for Aluminum Tile Edge Trim
Tools and Materials
Gather aluminum tile trim, measuring tape, pencil, miter saw or tile cutter, construction adhesive, level, drill, rubber mallet, grout, and tile spacers.
How to Install Edge Trim?
Step 1: Measure and Cut
Measure the tile edge. Cut the trim to the correct length with a miter saw or tile cutter. For corners, make a 45-degree cut.
Step 2: Prepare the Surface
Clean the tile surface. Remove dust and moisture to help the adhesive bond.
Step 3: Apply Adhesive
Spread construction adhesive on the back of the trim or set the trim into the tile adhesive bed. Use enough adhesive to hold the trim in place.
Step 4: Position the Trim
Press the trim against the tile edge. Check alignment with a level. Adjust before the adhesive sets.
Step 5: Install Tiles
Place tiles snugly against the trim. Use spacers to keep gaps even.
Step 6: Secure the Trim
If you need extra hold, use screws or anchors. Drill pilot holes to avoid damaging the trim or tiles.
Step 7: Grout and Finish
Let the adhesive cure. Apply grout between the tile and trim for a clean joint.
Step 8: Clean Up
Wipe away extra adhesive and grout before they dry. Use a damp cloth to clean the trim and tiles.
Example:
Cutting aluminum trim with a fine-toothed blade gives you a smooth edge. Practicing on scrap pieces can help you get a clean cut.
Correct installation protects tile edges and creates a professional finish. Follow these steps for strong, neat results that last.
Common Mistakes and Troubleshooting
Wrong Trim Height
Using trim that does not match the tile thickness causes uneven edges. Measure your tile and select trim with the same height. For example, pairing 12mm trim with 8mm tile leaves a visible gap.
Cutting Mistakes
Incorrect cuts create gaps or rough edges. Use a sharp miter saw or tile cutter. Double-check your measurements before cutting. Practice on scrap pieces for cleaner results.
Weak Adhesion
Applying too little adhesive or spreading it unevenly makes the trim loose over time. Cover the back of the trim with a consistent layer of adhesive. Press the trim firmly into place. In high-traffic areas, add screws or anchors for extra hold.
Misalignment
Crooked trim ruins the finished look. Use a level and spacers to keep the trim straight. Adjust the trim before the adhesive sets.
Troubleshooting Tip:
If you notice a problem, fix it before the adhesive cures. Remove and reset the trim as needed. For small gaps, use color-matched caulk to seal the area.
These steps help you avoid common installation errors and achieve a clean, durable finish. If you need help, ask a tile expert or watch a step-by-step video for guidance.
Frequently Asked Questions (FAQ)
Yes, high-quality aluminum trim is suitable for exterior use due to its corrosion resistance.
Use a miter saw with a fine-tooth blade or a specialized tile cutter for precise cuts.
Absolutely. Aluminum’s corrosion resistance makes it ideal for bathrooms, kitchens, and showers.
Many trims come in various finishes, and some can be powder-coated or anodized for custom colors.
Wrapping Up
Aluminum tile edge trim protects tile edges and creates a clean finish. It resists rust and offers multiple profiles for bathrooms, kitchens, and commercial spaces. Homeowners and professionals use aluminum trim to prevent chips, stop moisture, and create sharp transitions.
Measure your tile thickness and choose a matching profile. Install the trim with care. Clean and repair it regularly to keep it looking new. For example, a hotel lobby with well-installed aluminum trim keeps crisp tile edges after years of heavy use.
Choosing the right aluminum tile edge trim saves time and reduces maintenance. It keeps your project sharp and extends its lifespan. Aluminum trim is a smart choice for any tile job.